Advanced Acrylic Carving
Advanced Acrylic Carving
 This free artist's tutorial will help you advance from the first sculpture lesson. Gino teaches more about the different tools and bits used to sculpt and carve in this free online lesson. He will also show you a few new techniques!

 This is a recent second set of acrylic panels commissioned to Gino, and the
subject of this months' Help for the Apprentice.
This is a recent second set of acrylic panels commissioned to Gino, and the
subject of this months' Help for the Apprentice.
This set will not be colored, so here we will discuss more about the different bits and tools he uses to carve this medium. Fig. 2 shows these bits. Notice the 3 very small ones lying in the lid...those are Dentists' bits. The bits on the far right are diamond topped. Others on left are mostly dremel types. The brush is used to remove the acrylic flakes as Gino carves and then needs to see the results. Make sure your brush is not coarse, so as not to scratch the surface of the acrylic.
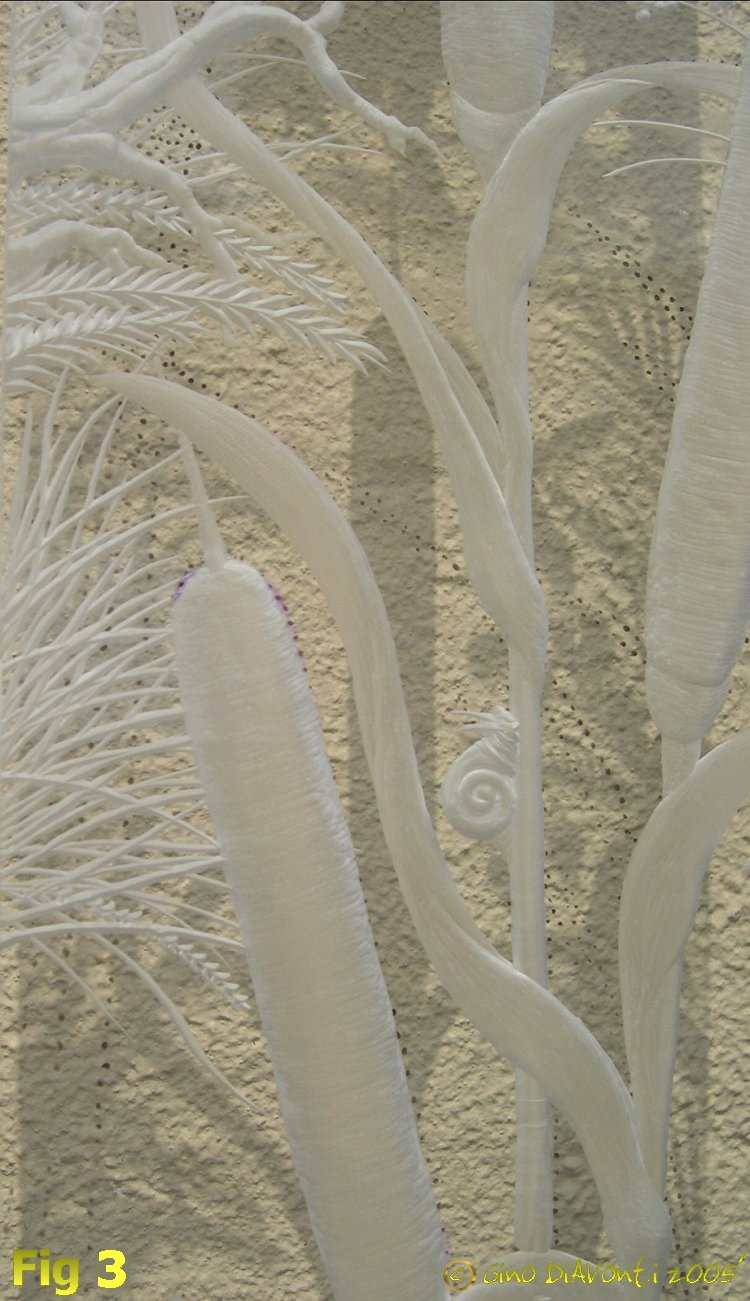
As told in the first Apprentice Help∼Intro to Carving Acrylic, Gino first makes the paper template, then pokes holes through the drawing in order to later spray paint over the surface (laid atop the acrylic). This puts the drawing onto the acrylic. You can see some of those tiny dots in Fig. 1. Click it to enlarge.

 Acrylic is a hard material, but Gino exclaims it is easier than carving Corian, which
eventually deformed his index finger. Practice on a small piece of acrylic first,
one you don't plan on keeping. This will show you what the incongruous bits will
do for you.
Acrylic is a hard material, but Gino exclaims it is easier than carving Corian, which
eventually deformed his index finger. Practice on a small piece of acrylic first,
one you don't plan on keeping. This will show you what the incongruous bits will
do for you.
Use a dremel with capabilites for various speeds, and mount it to a dowel placed horizontally above the carving so you can keep the machine out of your way while sculpting. (See Fig. 4) This also allows it to glide across the dowel. Should your Work be as long as these panels, that's very helpful.
Gino almost always "guts" the Work first. This means he takes it down to a level just above where he wants to begin the detail of the carving. The acrylic shown here is 3/4" thick, good for a deep carve. When the finished Work requires this deep look, Gino uses a Porter Cable tool to get into the acrylic. After the gutting, he begins itemizing the sculpture. That's where the dremel and bits come in.

 Gino wears reading glasses when carving. You should wear goggles. He has
gotten acrylic flakes in his eyes, and they really sting, not to mention
can scrape your eyeball. Gino swears that the goggles make his head sweat, so
he doesn't use them.
The reading glasses offer some protection, but frankly I don't believe enough.
Gino wears reading glasses when carving. You should wear goggles. He has
gotten acrylic flakes in his eyes, and they really sting, not to mention
can scrape your eyeball. Gino swears that the goggles make his head sweat, so
he doesn't use them.
The reading glasses offer some protection, but frankly I don't believe enough.
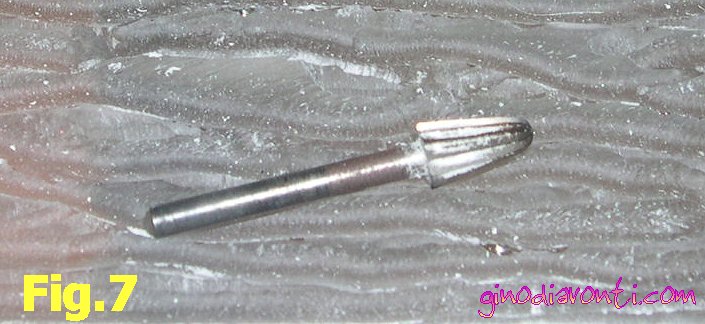 Here I will attempt to show you as he moves along with this carving, the effects
that some of the bits create. Fig 5 shows him making the fat diffenbachia type
leaves, and the bit he used to do it. Fig.7 is the bit that made the tree bark.
While watching him carve, I notice that he "drags" the bits along at
the depth he wishes to go, and with the right exsertion of pressure;
steadily cuts out the bark or leaf. Fig. 6 shows
the bit used to make the flowers seen in Fig.1, just above his name.
Here I will attempt to show you as he moves along with this carving, the effects
that some of the bits create. Fig 5 shows him making the fat diffenbachia type
leaves, and the bit he used to do it. Fig.7 is the bit that made the tree bark.
While watching him carve, I notice that he "drags" the bits along at
the depth he wishes to go, and with the right exsertion of pressure;
steadily cuts out the bark or leaf. Fig. 6 shows
the bit used to make the flowers seen in Fig.1, just above his name.
 After the Work is carved, Gino then moves onto finishing it off with sandpapers of
various grades (Fig 8). With the belt sander, he starts with grade *** paper, and slowly
moves up to grade *** . Notice the clamps pictured in Fig.4 are holding the piece to
the table while Gino applies pressure to the edge.
Then the jitterbug is used with grades *** and ***. Polishing
compound rubbed by hand with a chamois completes the Work.
After the Work is carved, Gino then moves onto finishing it off with sandpapers of
various grades (Fig 8). With the belt sander, he starts with grade *** paper, and slowly
moves up to grade *** . Notice the clamps pictured in Fig.4 are holding the piece to
the table while Gino applies pressure to the edge.
Then the jitterbug is used with grades *** and ***. Polishing
compound rubbed by hand with a chamois completes the Work.
Rubbing Compounds he used include red grit compound put out by Dremel, and finally Turtlewax polishing compound and scratch remover, used for car finishes.
The completed Work is pictured on the Gallery page.